For my film teaser trailer it was important to look at several examples of teaser trailers to be able understand what the connotations (what you would expect and what makes a something good in that genre) are for that genre. I was looking at several trailers both from the Action and Action Thriller genre to give me some inspiration for my story and to get a feel for the connotations of an Action Thriller so that I could decide to either meet them or challenge them. I made sure to pick trailers where the films had received 4 star or 5 star ratings. This meant that i would be learning from the best. I went through each of the trailers below and made detailed notes which I used to gather ideas from. Below each video is a brief summary of my notes.
To play the trailer videos simply click the play button located in the middle of each window
The Bourne Legacy Teaser Trailer
Above is the Bourne Legacy Teaser Trailer. The Bourne films have the same kind of story plot as my film and they are all Action Thriller Genre. I am briefly going to discuss what we see in this teaser trailer and extract some ideas that i can use in my filming.
Have seen all three films i noticed one thing very quickly. This trailer actual has shots from all three of the Bourne films which is very unusual. They have also opted to have very little camera shots in the trailer at all, they only have a few, the trailer is mostly dominated by prolonged text segments for example showing who the director is and the lead star Matt Damon and finally the title. In the few camera shots that are present we can get an idea of what you can expect from this serious spy film. Every one has very serious business like mannerisms and faces. All the camera shots are either close ups or mid close ups. This helps give the feeling of an isolated world or secrets. The teaser trailer is quite long at 1 min 35, the average for a teaser trailer generally being around 30 to 60 seconds. However i have seen a shift in the length of teaser trailers. I personally think they are becoming slightly longer pushing that one minute marker.
The Bourne Ultimatum teaser trailer
This more like a common teaser trailer being 32 seconds long. Its also done in a way that challenges the normal conventions. They have opted for the trailer not to be a series of different shots but instead a graphically generated interface system that hints to the tracking of a target named Jason Bourne. This is a very interesting method and I would have liked to try something like this. Unfortunately being a Media Studies student I do not have access to or the money for any advance video editing software which would allow me to create a trailer similar to this one.
The Bourne Ultimatum First Trailer
This isn't actually a teaser trailer but rather a short trailer. I can still look at this trailer however to get an idea of the types of camera shots used and what the content is like.
There is a lot to get out of this trailer. In the trailer they use very little dialogue. The audience is told some brief information about the protagonist with each piece of information being followed by a relating clip. In this case its shots from the previous two films. We also see a lot of action condensed into a short time. all the transitions from one clips to another are very fast passed, this keeps the pace going in the trailer and the pace builds and builds until it climaxes with the title of the film at the end which is followed by the release date and website address. There is a lot of faced paced action as the trailer progress, we see several fights, firefights and various stunts.
For camera shots we again see several mid closeups / closeups and wide shots. Everything towards the end of the trailer is fast paced action oriented where as the start of the trailer is much slower descriptive shots. The music supports this starting off slow but progressing in to much faster paced music.
Below are some other trailers I looked at to gather some more ideas though I did not go into as much detail as the Boune trailers
The Manchurian Candidate trailer
Enemy of the state trailer
Traitor Official Trailer
Teaser Trailer Codes and conventions
A teaser trailer is a shorter version of a main trailer usually released several months before the actual trailer and film is released. They are usually very short, lasting between 30-60 seconds although some films may have a lengthier teaser. They usual contain very little footage from the film itself. Some teaser trailer are however a shortened version of the main theatrical trailer. The purpose of the teaser trailer is in the name. It’s designed to show an idea of the film long before it’s due to come out and thus teases the audience.
Teaser trailers are not used to give the audience an idea of the actual content of the film. It’s designed to let the audience know that the film is coming out in the near future and to excite them so they look forward to its release. A teaser trailer is usually made while the film is still in production or being edited. On the other hand the teaser trailer may just be a cut down of the main theatrical trailer. Sometimes (more commonly these days) the teaser trailer may include actual clips from the film, but will usually not be placed chronological order as to not give the story away. A teaser trailer will almost never include and pot twist or major points in the film, this ensures that the plot twists and major points are still exciting for the audience (they haven’t already seen it).
For my teaser trailer I will for the most part follow the codes and conventions. I will keep the length of my teaser trailer between 40-60 seconds. I will use a mixture of footage, some that would be in the actual film and some that would not. This would still offer that teasing effect for the audience but at the same time establishing the type of film. I will be doing an action thriller because I feel out of all the film genres; it’s the most exciting and appealing for me.
So to summarize what a teaser trailer is I have made a few short points
A teaser trailer is a short trailer advertising a film or may be a shortened version of the main theatrical trailer.
They are usually very short, anywhere between 30-60 seconds (this may vary).
The purpose of a teaser trailer is not to tell the audience a great deal of information about the film, but rather to tease/entice them to want to watch the film when it comes out several months later.
They are generally released several months before the film or main theatrical trailer.
Thursday, 31 March 2011
Tools of the Trade
In this post I' am going to discuss all the software and hardware I used to create my project. I will also discusses what web functions I used to find information and inspiration. First I am going to talk about the hardware then software.
 Specs
Specs
Processor = Intel Core i7 Q720 1.6 GHz
Ram = 6GB DDR5
Graphics card = ATI Radeon HD 5870 1GB DDR5
These specification are more than enough to let me edit both clips and trailers without any freezing or glitching.
For the camera I used my schools media departments Cannon SLR EOS 40D camera, this allowed me to take high resolution photos that I could edit later.
 Its important to use a good SLR camera otherwise you will not get high resolution photos. When it comes do editing your photos and combining more than one image together if your not using images at a high resolution they will become very blurred when you try to re size or manipulate them. This wold give your work a very unprofessional look. So its very important to use a good SLR camera to insure that you get those high resolution images.

No matter what you create in media you are going to need good quality equipment, otherwise you not going to get a good quality product. To create a teaser trailer, poster and magazine front cover your going to need a few essential pieces of hardware.
-A high resolution HD video recorder
-A high resolution SLR digital camera
-A high resolution SLR digital camera
-A computer with decent graphics card and processor in order to edit your photos, clips etc.
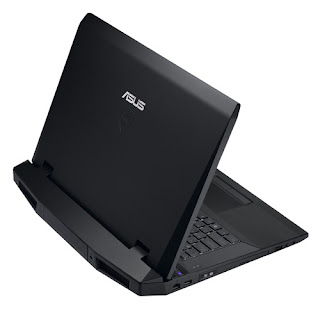
For the majority of the time I was doing most of my editing on my laptop which is an ASUS GH73.
SpecsProcessor = Intel Core i7 Q720 1.6 GHz
Ram = 6GB DDR5
Graphics card = ATI Radeon HD 5870 1GB DDR5
These specification are more than enough to let me edit both clips and trailers without any freezing or glitching.
For the camera I used my schools media departments Cannon SLR EOS 40D camera, this allowed me to take high resolution photos that I could edit later.
Its important to use a good SLR camera otherwise you will not get high resolution photos. When it comes do editing your photos and combining more than one image together if your not using images at a high resolution they will become very blurred when you try to re size or manipulate them. This wold give your work a very unprofessional look. So its very important to use a good SLR camera to insure that you get those high resolution images.For the video recorder I used my schools media department's HD recorder which was a Panosonic HDC-SD5.
 Simllar to the SLR camera for photos, you need an HD video camera in order to get high resolution clips that will give you a professional look. There is nothing worse than a film that blurry or out of focus.
To create my poster, teaser trailer and magazine front cover I used two pieces of software.
For editing my clips to create my teaser trailer I used Corel Video Studio Pro X2.

I originally wanted to use a professional video editing software called Sony Vegas Pro which would have allowed me to manipulate the video clips so i could add things like gunshots and bullet effects or even explosions. Unfortunately it cost around $600.00 US dollars, me being a media student theres no way I could afford it. So I used my schools video editing software Corel VideoStudio Pro X2. I am going to start off by saying that I would not recommend this video editing software to anyone. Its so frustrating use and work can easily be lost if you don't follow very specific routines. But I wont complain to much because I did help me create what I think is A reasonably good trailer. It does have a wealth of features for editing clips and sound and then combining them together. Its in no way a bad piece of software, everything an A2 students needs is there, just no enough functions that I wanted.
For editing my poster and magazine front cover I used Adobe Photoshop CS5. This a piece of professional software that allows any one to create a professional looking product relatively easily. It allows you to re size an image in any way and manipulate any image. You can then combine images on to one image and using a layer system you can keep track of them, place one image over another and edit several images on the same main image. Its ideal for for editing images, creating poster and magazine covers.

I used several different types of web functions. I used google to search for various images and trailers to get an idea of what I wanted to do for my project. I also used google to find good filming location in Dubai and the Middle East. I used Youtube to search for various trailer o get inspiration and find out what makes a good action thriller teaser trailer. As you can already tell, i used blogger.com to write up my notes in blog form so that everyone can have access to them and see my creative process throughout my project.


Filming
At the very start of my project I had decided to do something different. I wanted to go somewhere to film my trailer where no one else would likely go. Most media studies students will end up filming there trailer either at school, home or somewhere local. If we are honest most professional films are never filmed in these locations, at least not in the action thriller genre. In class an idea came to me. I was going to split my teaser trailer into two parts. 1 part being filmed at my school (I am a border so no real choice there) and in Dubai. Yes as in the Middle East. My main actor and protagonist for my film was going to be my best friend Stuart. I approached him one night an discussed the idea of flying to Dubai to film half of my trailer, we would stay at my parents house. He loved the idea so we booked the tickets for the Lent half term break. When we came back after the break I had several dozen clips to choose from. I filmed the second half of my trailer at my school which presented several challenges. I had to choose shooting location that would show that it was a school otherwise my teaser would just look unprofessional. In later posts I will go into further detail about my filming experiences for both of these two shooting locations (It's technically three but I will go into more detail).
So what is a teaser trailer?
A teaser trailer (or just teaser) is a short trailer used to advertise an upcoming film, television program, video game etc. They are usually released long in advance of the product, so as to "tease" the audience
Teasers are also commonly used in advertising. The so called teaser ad or teaser campaign typically consists of a series of small, cryptic, challenging advertisement which anticipate a larger, full-blown campaign for a product launch or otherwise important event.
(Before you jump the gun, yes that was copied and pasted from a wikipedia definition)
Film teaser trailers unlike other teaser trailers are usually very short in length (between 30-60 seconds) and usually contain little, if any, actual footage from the film. Their main goal is to give audience a small taste of what is to come to get them interested and talking about the film, 'tease' them as it were.
Filming 2: Dubai
Me and Stuart arrived in Dubai on the 26th of October. We spent the 27th looking around for filming locations we could use. We decided on 5 different locations listed below.
-My parents house in Um Sequim 3
-The construction site across the road from my parents house. Was not in use when we filmed there.
-Jumeriah Beach Hotel
-Mall of the Emirates
I am going to load some of my raw clips onto this post and then discuss about them and my thought process behind them. Why it worked, why it didn't etc.
The first two clips I' am going to show you are from the front gate of my parents house. The Idea was to have the FIXER (Stuart) sneak along a wall and then quickly lock pick the gate and go in.
Below I' am going to show two of the 12 takes I took.
When i decided to do these shots the idea was to show the FIXER sneaking up to the gate and opening it with a lock pick. The idea being that I would take these two clips and a third one and morph them into one fluid clip. Now lets take these two apart. When I got back to and looked over these two clips in more detail I straight away cast it aside. There several things that didn't make sense. In the clips you can clearly see that its a street and you can hear cars coming past. Your not going to try and sneak around on a busy street, its gonna be blatantly obvious that you are up to no good. So these two clips and there other similar clips got a big X through them.
Then I considered the idea of him Infiltrating the house and how he would be dressed. So I went through my closet, found a black hood, went down stairs got a blade out of the kitchen door (making sure that it wasn't a regular kitchen knife) and then we went up stairs to the top floor to film. This shot was something akin to a ninja scene.
In the end I did end up using this clip for my teaser trailer and there some good points about it and some bad points. When filming takes the director is always going to want to change something and the actors can get reasonably annoyed about this, as you can see in this clip. Stuart stamps his way back up the stairs and sighs after I tell him to do it again. One negative point to consider about this is his arms, he probably should have been wearing a long sleeve shirt but its not a major issue. Other than that he moved down the stairs in a silent appropriate manner giving off the connotations that he silent stalking through a house have come in through the rough. Bare in mind that for the final teaser cut this clip to be a lot shorter and sped up the clip as well.
The next day we decided to film a couple of running shots in the construction site across the road from my parents house. Now bare in mind that it might just look like sand with a couple dumber trucks on it, but there are houses being built all around it. I' am going to upload 2 clips of different angles I tried. my original idea was to have 3 different shots that would be morphed into one to make one continuous running sequence.
If you have a keen eye the first thing you will notice is that he first clip was taken later on in the day then the first, which is a problem that can easily be fixed in video editing software by changing the brightness and contrast. When editing these two clips I sped up the clip so that it would look like he was running extremely fast.
These two work well linked together as they can easily transition from one to other. The first clip also has an impressive has the hazy outline of downtown Dubai in the distance, this gives the viewer the sense of place, they can tell this shot takes place in Dubai. That is assuming of course that they know roughly what downtown Dubai looks like.
Right next to the construction site is a busy main road called Al Wahysi. Dubai is well known for its expensive sports cars, so I decided to be cheeky and film one driving past. I could then speed up the image and make it look like the car was going faster. The clip wasn't to bad, I ended up using the bike as the FIXER in one of my extended teaser trailers. But for every single other shot all the cars slowed down as they approached the camera. I guess they thought it was a speed camera, I mean because to white English guys in shorts and t-shirts really look like police but who knows. Oh yes, please ignore Stuart's stupid laugh (I muted the sound for this clip when editing it)
Filming 3: Hatta mountain range
I was sitting in the living room watching TV with Stuart when an advert came on for the Marriot mountain resort in the Hatta mountain range. About halfway through the advert I turned to Stuart and said, "mate we are filming there." We printed out directions and the next day we drove the 3 hour drive through the desert to Hatta. I think this is the most fun I had during my project, just driving through this amazing landscape, the open sand dunes and then into the rocky mountains. We both had an amazing time.
Below I am going to show you a couple of clips from both the Marriot resort and a small mountain we climbed located next to it.
The premise for the FIXER being in Hatta was that he was there to assinate a target. This first shot was one of several shots showing the FIXER walking up to the hotel and then entering through the front door. I choose the show you this clip to give you a sense of just how amazing the Hatta is. In this first clips you see two mountains. a huge mountain range at the back and a smaller one in front of it. we climbed up the closest one to take several more shots., 3 of which are below.
In most professional shots there are always non obvious things that give off connotations about the film as a whole or one particular scene. Ideally you should always try to make every shot mean something. When we climbed up to the top of the small mountain (or giant hill for all u picky people) the first thing I saw was the bigger mountain range ahead. I looked at the formation and saw it was jagged and increased in height at equal interval up to the peak. the First thing I had Stu (the FIXER) was stand up side on to the mountain in the distant. I then position the camera carefully to match his shoulder height with the mountain range in the distance so it looked like the top of the mountain range was in line with his shoulder. look at the clip again to see this. The connotation of this being that this shot shows the FIXER has an uphill struggle ahead of him. This is the emphasized when he looks at the mountains.
I then tried something similar using the mountain range behind us. By using camera angles to make him seem bigger than the mountains it give the impression that here is a guy as powerful as a mount in. Little cheesy but the idea is there.
After taking several other shots we then went slightly down the mountain to a flat plateau and i decided to film FIXER shooting a bow and arrow with a desert backdrop. As seen in the clip below
Here is the first take of this shot that.... well went a little wrong shall we say.
Filming 4: St. Emunds College
Unfortunately I spend most of the school year living at boarding school which provides a rather big problem. The one location you want to avoid filming at is your school. There is nothing worse then a film that was shot at a school. In my case I had no choice, so I had to film in locations that didn't represent or look like a school as much as possible. This was a big challenge to start off with. I started off by going around the school and the school grounds looking for areas that I could use to film that didn't represent a school. One advantage to St. Edmunds College in filming terms is the fact that its such an old building, it doesn't look like most modern schools. As a result if you can avoid areas with signs, school logos or anything that looks like a classroom or school corridor you should be fine.
I spent several hours walking around during lunch time and it occurred to me that it would be much better to look for good filming areas at night. The FIXER being a highly skilled agent isn't going to infiltrate a building in daylight. He would do it at night and as a result I started looking at night using only natural lighting too keep to the naturalistic themes commonly seen in action thriller genre.
Once I picked out a few areas I started to brain storm some ideas
of what I could portray. I took several different shots and i experimented with different angles.
Below are a few of the clips I took. I' am going to look at each one and talking about what works and what doesn't.
There are a few reasons why this shot works well. Number one being the fact cant really tell its a school which is objective number 1. Having the FIXER walk into the shot and then walking through it, is a powerful image. This is emphasized by the gun he carries and the hot breath in the cold air. Dressed in all black and armed its clear that hes walking towards this building with the intent of doing some damage. These are all connotations that an audience can pick up on.
When editing this clip I would cut it down a lot. I would make him instantly walk into the shot and have it cut when hes about half way. This makes the shot long enough to provide a powerful image but all stops the clips from becoming boring. I would also mute the clips sound.
Note please ignore my coughing I was ill at the time so I apologise.
Most black op operatives are often regarded as ghosts, they can go into and area and complete a task with anyone ever knowing they were there. I ponder on how I could achieve the idea of the FIXER being a ghost with the equipment, and I had an idea. If your filming at night your camera can often become de-focused, this results in a blurring affect to movement or pix elation. Your camera will often try to refocuses it self or not let you take any video till its focused. To achieve this shot i fist de-focused the camera using automatic focusing. I had to play around with it a while until it stayed de-focused. I then turned the camera to manual focus so that it would auto focus. As a result when the FIXER (Stuart) moved towards the camera his movements were blurred as a result. This gave the sense that hes was some kind of ghost.
This is apart of a fight scene that i was working on for the trailer. You may have easily figured out that its a school corridor maybe not. Its actual a very small area I had the camera right up against the wall and i had to peak my head round to see what was in the shot. This was one of the possible ideas for a struggle over a gun. This is a clip of the third take for the gun drop that these two had been working on. The reason why this clip doesn't work really well is because one its looks a little to fake and three the dropping of the gun is just to passive.
The two clips above are linked together and intended to be shown one after another. The Idea for this shot was that the FIXER would emerge from the darkness and then execute the target in question. It works because it emphasizes that idea of the agent appearing in silence from the shadows, however the two shots to the body in the second clip suggest that this kill is more personal then professional.
In terms of editing for these two clips i would have muted both. I also would shorten the length of each clip and add suppressed gun shots.
Editing my teaser trailer
Once I had finished collecting all the clips I needed, I opened Corel Video Studio 12 and began editing my film. I started off by inputting some of the clips from St. Edmunds College. I choose the 4 clips which show the FIXER hitting a guard over the head with his pistol. I then started off by muting them and cutting them down and then putting them in a consecutive sequence which linked them together fluidly. I used these 4 clips just to practice my editing skills and how to make use of all the tools/ functions I would need to use for my trailer.
Once I practiced a few times with the four clips I started to go through all the clips I had taken and began choosing what I thought was the best. I then had my friend look over them and agree or disagree on what clips I had chosen. Once I had a series of clips we had both agreed on I inputted them into Corel in the rough order that I wanted. My initial idea was to enter all the clips I thought would be good into a long trailer. I would then go through and edit each clip and link them into the next scene. I would then end of with a long first version of the trailer. From this I could then cut down the trailer to a much shorter version which I could cut clips from and add any new ones that were required.
Once I had finished editing each clip I then proceeded to add captions and both soundtracks and sound effects. making sure that the caption were both in-tune and emphasized by the soundtrack. Below are a few print screens I took while working on my trailer. Underneath each one I will discuss what I was doing and what my thought process was at the time.
I had planned to make this long version of my teaser trailer (this is normal trailer length) which I could then cut down and add anything needed. Once I finished the extended trailer I looked at with Myroslava (A2 Media Student) and we both looked at what worked and what didn't. We looked at areas that could be cut and what needed to be added or changed.
The first thing we decided was that the first shot of the FIXER panning his head to the mountains was too long, so I shortened that.
The ninja bit when he was walking down the stairs needed to be spend up and the second ninja shot needed to sped up also.
The running segment although good needed to be cut. I decided to keep the first part of the running shot and speed it up. I then cut all the other integrated running shots and the motor bike shot.
I then decided to cut the last shot altogether. The clip was too long and the hit over the head wasn't a very good climax to the trailer, it was to subtle and plain.
Once I removed what needed to be cut me and Mosh (Myroslava) Started to discusses what need to be added. I consider added some more action to the piece as well as speeding up a few shots and cutting a few more milliseconds off some clips. I decided to add two fighting scenes and then an execution at the end of the trailer as a more effective climax that created a image that provoked the audience imagination to try and understand why this person was being killed.
Once I finished re-editing the new shortened teaser trailer I had my whole Media class watch it and give me some feedback. Overall the feedback was very positive and some recommendation to shorten some clips further were made and I edited them accordingly.
Below is the final version of my teaser trailer for The FIXER
The FIXER teaser trailer from Alex Dodds on Vimeo.
Once I practiced a few times with the four clips I started to go through all the clips I had taken and began choosing what I thought was the best. I then had my friend look over them and agree or disagree on what clips I had chosen. Once I had a series of clips we had both agreed on I inputted them into Corel in the rough order that I wanted. My initial idea was to enter all the clips I thought would be good into a long trailer. I would then go through and edit each clip and link them into the next scene. I would then end of with a long first version of the trailer. From this I could then cut down the trailer to a much shorter version which I could cut clips from and add any new ones that were required.
Once I had finished editing each clip I then proceeded to add captions and both soundtracks and sound effects. making sure that the caption were both in-tune and emphasized by the soundtrack. Below are a few print screens I took while working on my trailer. Underneath each one I will discuss what I was doing and what my thought process was at the time.
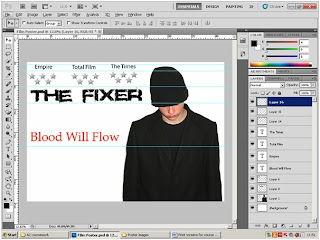
 Above is a print screen showing me editing the timeline of the teaser trailer. The timeline is the order in which clips the progress through the trailer. I never really had a set order for my trailer, I just laced clips in the order that I thought looked good. I choose to keep in line with the convention of an action trailer by starting off with slightly longer shots and ending in more fast paced clips.
Unfortunately Corel Video Studio 12 is not the best piece of video editing software and at times it was so frustrating that i felt like picking up my computer and hurling it out the window. Most raw clips you have will be to long so you need to cut segments of the clip out. In Corel if you cut a clip to much you couldn't simply undo what you did you would have to delete the clip from the timeline and re insert it from the library and then re cut it. This got extremely frustrating at times, especially if you cut a clip several times.
In the screen shot above I' am editing the length of my Production studios' logo. This wasn't a clip but rather an image that I had running for a set amount of time. I needed to make the image display long enough for the audience to take it in but short enough so that it doesn't drag out or bore the audience. Its important to keep clips as short as possible otherwise your teaser trailers length goes up very quickly.

Throughout the trailer there were several clips that I needed to speed up for different reasons. Some I had to speed up because they took to long and others to make them more action oriented. For example if you looked at the raw clip of the FIXER running across the construction site it would just look like and average person sprinting. By speeding up the clip you can turn ordinary Stuart Mc Cammont into a pure athlete by making it appear as though he is running at an Olympic speed.
In the print screen above I'am speeding up the clip of a motor bike passing the camera. In Corel its very easy to change the speed of a clip. If you look at the pop up window it gives you the option to change the play speed using a slider or by typing in the play speed yourself. You can test the new play speed by clicking test. This is useful because it allows find the right speed you want before you alter the clip. The reason I had to speed up the clip of the bike passing is because he was travelling to slow. In action films its very unlikely that you will see someone driving cautiously, they will almost always be travelling vast. So in order to use the clip I would have to speed it up.

Once I had finished placing all the clips in order and editing them I need to add captions. Captions are used in trailers to give away a small piece of narrative or to hint at what the film is about without giving away the overall storyline or any major events in the story/ film.
For all the caption I choose the font Palatino Linotype because its has a very bold and outright look to it. I choose size 68 so that the words would be large and stand out making them more powerful. I went through the teaser adding text where needed. After my first version of the trailer I changed a few of the caption and the layout of them. I had the idea to link in some branding. I would have key words in each caption the colour red so they stood at more and emphasized what was being said. I would then transfer this same branding over to my poster and magazine where the title would be laid out in the same order. The (in either white or silver) FIXER (in red). I got the idea for this when i saw a similar branding in the Bourne Ultimatum teaser trailer.
 By far the hardest and most difficult aspect of editing my trailer was the sound. In a good trailer the sound track/ sound effects should match events within a clip. this helps emphasize what is going on and make the trailer visuals and sound more fluid.
I spent several hours searching for a possible sound tracks to use for my trailer. There is of course a legal issue involved in this. You cant just take someones work and use it for profit. However as a result of my work just being coursework and non profit I don't have to worry about breaking any copyright laws. If this were an actual funded add campaign you would require permission from the publishing company to use the record. At any rate I haven't used the full length version of any tracks.
After looking at several different songs I eventually settled with the non- lyrical version of 'The Servant' by Cells. This is a track featured in several different action films and it is used in all 3 Transporter movies.
I spent ages editing clips and the sound track so that both events in clips and the sound matched up together.
The only sound effects I used in my teaser trailer was the sound a of a suppressed pistol being fire. I got the sound by converting a youtube file to an mp3 file format. I then duplicated the sound and synced it to the two shots in the final clip.
This is the first extended version of my teaser trailer
I had planned to make this long version of my teaser trailer (this is normal trailer length) which I could then cut down and add anything needed. Once I finished the extended trailer I looked at with Myroslava (A2 Media Student) and we both looked at what worked and what didn't. We looked at areas that could be cut and what needed to be added or changed.
The first thing we decided was that the first shot of the FIXER panning his head to the mountains was too long, so I shortened that.
The ninja bit when he was walking down the stairs needed to be spend up and the second ninja shot needed to sped up also.
The running segment although good needed to be cut. I decided to keep the first part of the running shot and speed it up. I then cut all the other integrated running shots and the motor bike shot.
I then decided to cut the last shot altogether. The clip was too long and the hit over the head wasn't a very good climax to the trailer, it was to subtle and plain.
Once I removed what needed to be cut me and Mosh (Myroslava) Started to discusses what need to be added. I consider added some more action to the piece as well as speeding up a few shots and cutting a few more milliseconds off some clips. I decided to add two fighting scenes and then an execution at the end of the trailer as a more effective climax that created a image that provoked the audience imagination to try and understand why this person was being killed.
Once I finished re-editing the new shortened teaser trailer I had my whole Media class watch it and give me some feedback. Overall the feedback was very positive and some recommendation to shorten some clips further were made and I edited them accordingly.
Below is the final version of my teaser trailer for The FIXER
The FIXER teaser trailer from Alex Dodds on Vimeo.
Creating my magazine front cover
Once I finished researching the conventions of a film magazine front cover I could start designing my own. I started off by taking several photos I would need for the front cover. From the start I had this image of the the FIXER being surrounded by fire, so in addition to several shot of the fixer I also took several shot of a bonfire. I took around 40 pictures of the FIXER in different position, different angles and with props or added clothing.
Below are 4 images (chosen from the several shots like them) that I used throughout the designing pf both my magazine front cover and my film poster.
 Now you can see that these images were not taken in a proper studio. They were in fact taken on a whitish wall next to a bathroom. Unfortunately my actor wasn't available when the media studio was set up. It didn't matter though because I used Adobe photoshop to simple remove the background although this was very tedious.
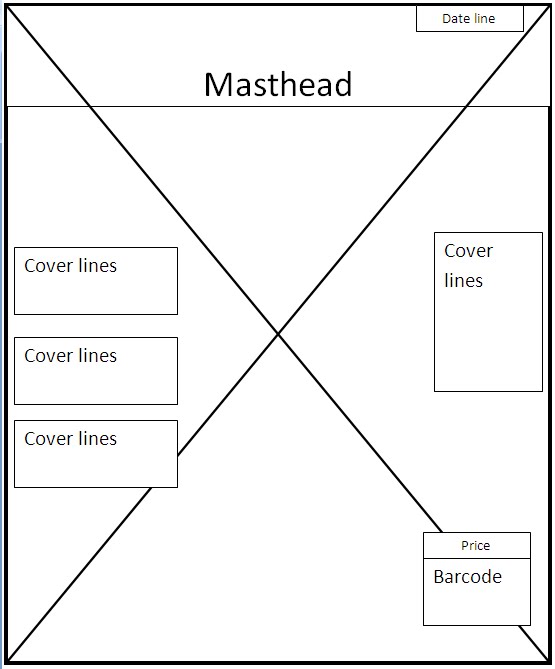
I started off by design a rough outline of what it should look like and where everything would be roughly laid out. Planning is important because it allows you to be creative yet still meet the requirements (in this case meeting the norms for a film magazine front cover). Below is a copy of my rough designs for the front cover.
 I will note that I had hand drawn a much more detailed version of my rough draft with all the measurements included. This would allow anyone to take my designs and reproduce them exactly, but I haven't included them here.
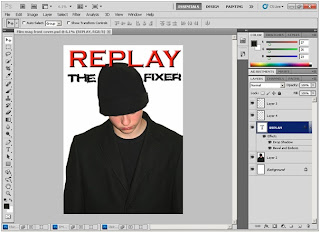 I started off by creating a blank sheet A4 size sheet in Adobe Photoshop. I then transferred the photo of the FIXER looking down. I debated as to what to use as the title of my film magazine but I eventually choose 'Replay'.
I added the title 'Replay' as the masthead and used bevel and emboss to to give it a 3D effect to make the title stand out more. I added some drop shadow and colour red to further make it stand out.
I used an online line text graphics generator to create the broken/ fractured text to spell out the title 'The Fixer.' I split the title into two and placed each word either side of the main image.
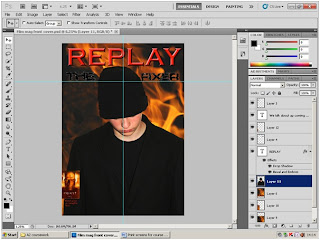
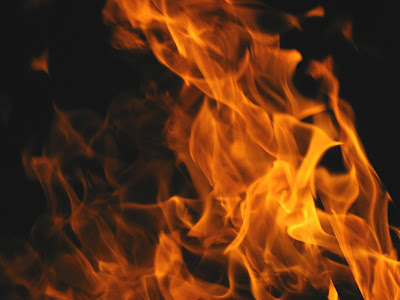
I then used a photo of flames and mounted it as a layer behind the main image and text. I warped a few areas of the fire using the clone stamp tool to drag some flames out longer and spread the fire in some areas a little more. I added a coverline in the form of a film preview for the upcoming film 'Priest.' I placed it in the bottom left third of the page so that it stuck out but did not cover to much of the main image.
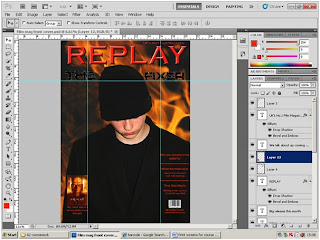 Next step was to add the selling line at the top right hand third of that page, "The UK no 1. Film Magazine."
I then added 3 more cover lines on the middle right hand third. I used a red line as a nice divider between each coverline. I made the header for the cover liner larger than the text underneath to make it standout more. Everything on a magazine cover should be designed so it maximizes the potential to grab someones attention and then draw them in effectively so that they pick up the magazine and read the contents page for example and ultimately possibly buy it.
I then added the bar code (I used a high resolution image off the Internet) and the price for the magazine which I set at a reasonable 3.oo pounds.
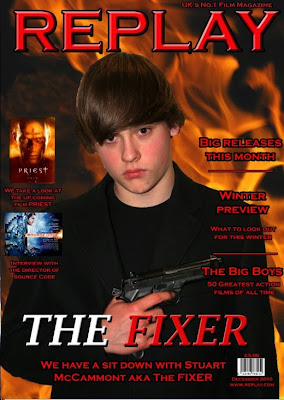
When I had finished my magazine front cover I asked my class and several other students at my school to comment and give me some feedback. A lot of people recommended that I should add some more cover lines and make the text a little bigger. My media teacher Mr. Breeze then pointed out something very interesting to me, he said, "In that photo shows him looking down. Have you ever seen a magazine cover where the person looks down? They always looking straight at you." The first thing I did was grab a bunch of EMPIRE and Total FILM magazine and go through re looking over loads of front covers and sure enough they are all looking straight at you.
As a result I changed the main image and added an extra coverline with picture at the bottom left hand third of the page. I then took all the coverlines and enlarged there size and put a black outer glow effect to make them standout more.
Acting on audience feedback I removed the original film title and change it to a much large Silver and Red combination and placed it at the bottom of the page as well as adding a main coverline about an interview underneath the title.
Below are 4 images (chosen from the several shots like them) that I used throughout the designing pf both my magazine front cover and my film poster.


 Now you can see that these images were not taken in a proper studio. They were in fact taken on a whitish wall next to a bathroom. Unfortunately my actor wasn't available when the media studio was set up. It didn't matter though because I used Adobe photoshop to simple remove the background although this was very tedious.
I started off by design a rough outline of what it should look like and where everything would be roughly laid out. Planning is important because it allows you to be creative yet still meet the requirements (in this case meeting the norms for a film magazine front cover). Below is a copy of my rough designs for the front cover.
 I will note that I had hand drawn a much more detailed version of my rough draft with all the measurements included. This would allow anyone to take my designs and reproduce them exactly, but I haven't included them here.
 I started off by creating a blank sheet A4 size sheet in Adobe Photoshop. I then transferred the photo of the FIXER looking down. I debated as to what to use as the title of my film magazine but I eventually choose 'Replay'.
I added the title 'Replay' as the masthead and used bevel and emboss to to give it a 3D effect to make the title stand out more. I added some drop shadow and colour red to further make it stand out.
I used an online line text graphics generator to create the broken/ fractured text to spell out the title 'The Fixer.' I split the title into two and placed each word either side of the main image.

I then used a photo of flames and mounted it as a layer behind the main image and text. I warped a few areas of the fire using the clone stamp tool to drag some flames out longer and spread the fire in some areas a little more. I added a coverline in the form of a film preview for the upcoming film 'Priest.' I placed it in the bottom left third of the page so that it stuck out but did not cover to much of the main image.
 Next step was to add the selling line at the top right hand third of that page, "The UK no 1. Film Magazine."
I then added 3 more cover lines on the middle right hand third. I used a red line as a nice divider between each coverline. I made the header for the cover liner larger than the text underneath to make it standout more. Everything on a magazine cover should be designed so it maximizes the potential to grab someones attention and then draw them in effectively so that they pick up the magazine and read the contents page for example and ultimately possibly buy it.
I then added the bar code (I used a high resolution image off the Internet) and the price for the magazine which I set at a reasonable 3.oo pounds.
When I had finished my magazine front cover I asked my class and several other students at my school to comment and give me some feedback. A lot of people recommended that I should add some more cover lines and make the text a little bigger. My media teacher Mr. Breeze then pointed out something very interesting to me, he said, "In that photo shows him looking down. Have you ever seen a magazine cover where the person looks down? They always looking straight at you." The first thing I did was grab a bunch of EMPIRE and Total FILM magazine and go through re looking over loads of front covers and sure enough they are all looking straight at you.
As a result I changed the main image and added an extra coverline with picture at the bottom left hand third of the page. I then took all the coverlines and enlarged there size and put a black outer glow effect to make them standout more.
Acting on audience feedback I removed the original film title and change it to a much large Silver and Red combination and placed it at the bottom of the page as well as adding a main coverline about an interview underneath the title.

Once I had finished creating my final version of the Magazine front cover I asked ex St.Edmunds College media student Billy form to give me his thoughts on my magazine trailer, what worked for him, what didnt. Below is his video.
His feedback was very positive and from his reactions its clear that I have met the conventions for an action thriller based magazine front cover and that I have prehaps challenged them by having an action thriller that also has a much darker tone to it.
Creating Panther Studios Logo
Most people for there A2 coursework just use an exsisting publisher that hasnt actual pubslished any of there work. So I decided to be orgional and create my own film production company. I asked my friend who does graphic design to create me two graphics that depicted animals. He gave me one comical looking beaver and a drawing of a panther. When Iooked at both these graphics two names popped into my head. Beaver Productions (image below) and Panther Studios. I opted to go for the less comedic version Panther Studios.

When Iooked at both these graphics two names popped into my head. Beaver Productions and Panther Studios. I opted to go for the less comedic version Panther Studios. I started by creating a blank page in Adobe photoshop and transfering the Panther drawing across. I then added the text Panther Studios in bold font Palatino Linotype. I then added a tiny bit of drop shadow and some bevel and emboss to give it that 3D effect. I decided to use the gradient tool using colours white and black to give it that two toned look fading from white (at top) to black (at bottom)
Below is the finished product of my Panther Studios Logo
Creating my poster
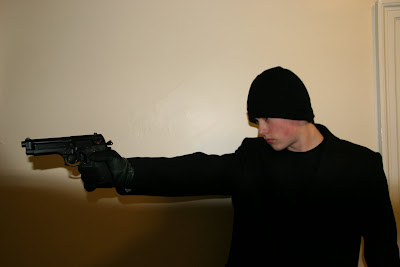
Once I finished doing my research into the conventions of film poster I could start creating my own film poster. I started off by choosing the image of The FIXER look down with the black beanie on.
 I first added the main image and placed it on the A3 size canvas. I removed all the background from the image and slightly darkened section of the jacket so that it was was one colour all the way through, no shine or shadows.
I then added 3 critics. I choose the film magazines EMPIRE plus Total Film and the newspaper The Times. I got a high resolution image of a silver star off google. I then duplicated the start 5 times and laid it out in a group, I then merged all the layers together to create one layer. Once I finished merging the layers together I took the new layer and duplicated it twice. I then took one group of 5 stars and placed them under each Magazine and the one newspaper.
I then added the same fragmented/ destruction style title for The FIXER as I had used in my original Magazine front cover, and added the quote Blood will flow.
 I sat back and looked at my poster so far. Although you could say that the white background worked well, I wasn't really satisfied by it. So I decided to create a diffused looking background. Something like static. I started by using a grey layer and then adding a grain effect, I repeated the grain effect twice until I got what you see above. I thought for one made them image of the FIXER standout more and gave the connotation that very little its no about the situation this man is in. I t also gives that mysterious feel to it.
 I wasn't really pleased with the poster background so i scarped it and decided to go for an all black background. I also got rid of the destruction graphic and replaced it with the same font as my magazine front cover.
I then decide to change the titles for the two magazines and The times to a red colour and I added a red diffused outer glow to them to make them subtly stand out.
I considered how I could show a sense of action within my poster, so I decided to through in a high resolution picture (Got from internet) of a Colt .45 ACP. Problem was that it was to bright for the rest of the image and drew attention away from the main image of the FIXER. So I used the curve tool too evenly decrease the brightness of the gun so that it blended in with the background. You can see this change in the two images above.
 Once I finished creating this version of the poster I asked my CLass for feedback. They liked the overall layout of the poster but several people disliked the plain image of the gun. It didnt give a striaght and clear impression that its an action film. So working on their feedback I got rid of the image of the Colt .45ACP and change it to an image of the FIXER holding a Barreta 9mm and point at a slight angle.
I then added my company logo Panther Studious long with a 15 rating logo and the Dolby DIgitol Sound logo.
 My next step was to add the full list at the bottom of the poster. This included all the producers, publishers, directors, main actors, filming director, sound director, editing director etc. I also added the Dreamworks Logo.
I put two quotes under on of the magazines and The Times. I thought they were catchy lines prasing the film. I made the text white with a red outer diffuesed glow s they stood out really well. I also added a red outer difussed glow to the stars and I shortened the star ratings to 4 stars to be a little more realistic. I then hanged the colour of the main tite to White and Red to match both the magazine front cover and my teaser trailer.
Aboveis the final version of my film poster.
Once I had finished creating my final version of my film poster I asked ex St.Edmunds College media student Billy form to give me his thoughts on my film poster, what worked for him, what didnt. Below is his video.
Subscribe to:
Comments (Atom)